Monday, December 16, 2013
Roasted Chicken and Toast á la Limoges
Posted by
Macerating Shallots
at
5:01 PM
0
comments
![]()
Sunday, March 24, 2013
Burmese Tea Leaf Salad
I headed to San Francisco last weekend, for the first time believe it or not, and had a remarkable culinary discovery at a place in the inner Richmond called Burma Superstar: Tea leaf salad, which you see above (I didn't get a shot of my own, so I pinched one from Grace Chen of cityfoodsters.com). We don't have a Burmese community in Portland, but we have some adventurous Southeast Asian restaurants, so once I got home, I figured I'd be able to find it somewhere around town. I was wrong. Nobody's doing this dish here, that I've yet found, anyway. So I set out to try and recreate what I'd had.
The definitive ingredient in this salad is fermented tea leaves, which due to a general lack of trade between Burma and the U.S., as well as a couple of really sketchy chemicals used in most commercial Burmese preparations, is basically impossible to get here (apparently, the Burma Superstar folks make regular excursions to Burma and mule a bunch of it back). There used to be an importer in London that you could order it from, but that source seems to have since dried up (and who wants to pay $40 in shipping for $2 worth of fermented tea leaves?). Making them myself wasn't really an option, as the process takes months and, presumably, a tropical climate, so the next best alternative was to use pickled tea leaves instead. I found this recipe online, for both the pickled tea leaves and the salad itself, and altered it a bit for my own purposes.
This salad is a two-step process, the first being the pickling and pureeing of the tea leaves. Here's the mise on that:
Posted by
Tommy
at
2:39 PM
1 comments
![]()
Wednesday, February 13, 2013
Adventures in Juicing, Part One

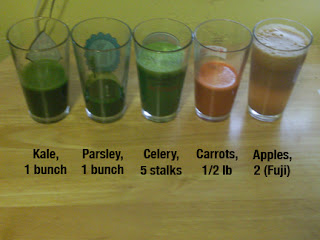
So I've been doing some snooping around on the subject of juicing lately, and finally decided to give it a try. After a bit of research into juicers, I landed on the Hamilton Beach Big Mouth Juice Extractor (model 67650). I headed over to New Seasons today to pick out some produce, pretty much at random, and came home with kale, parsley, celery, carrots and apples. You can see in the photo above how much the indicated amounts yielded in juice, using standard pint glasses for scale. The juicer handled these quite nicely, and as this site isn't about endorsing any specific products, I'll leave it that.
There are a number of considerations in all of this, of course, first and foremost flavor. How did all of this juice taste? The kale juice tasted a bit like grass clippings; I probably wouldn't drink it on its own. The parsley and celery juice tasted like, well, parsley and celery (one interesting observation here: the parsley juice came out weirdly gelatinous). The carrot juice tasted like carrots, but a little sweeter than in their whole form. The apple juice fell somewhere between cider and filtered juice. Next, I combined them, in the proportions above. Here's what that looked like:

This tasted pretty good. Celery was the dominant flavor (which in my case is a good thing, as I really like the flavor of celery; it's the texture that's always kept me away), the sweetness from the carrots and apples came through pretty nicely, and the vegetal flavors of the kale and parsley rounded it out and were particularly strong on the nose, to put it into nerdy beer/wine tasting terms. The next thing I did was to combine about a third of the pulp back into it, via blender (the rest of the pulp became a snack for the chickens). I had to really liquefy it on the highest setting for about 60 seconds to get a smooth texture. Even with that, it was still a little on the chunky side, but not too bad. The flavor wasn't quite as sweet as the juice alone, and in fact was slightly salty. Still pretty damn good, though. It did separate, quite considerably actually, as I made my way through it. Definitely best drunk from a bottle which you can shake between sips.
The second consideration is nutrition. This is something I've been taking fairly seriously in recent years, as I've passed 40 and my lifestyle remains, shall we say, guided by vices. I've become a big fan of George Mateljan's website, The World's Healthiest Foods, which contains an enormous wealth of information on the nutritional benefits of any number of different foods, and it's been a great help in tailoring my diet (I haven't necessarily slimmed down any, but on balance the food I eat now is way healthier than it was even five years ago). A considerable amount of the vitamins, minerals, phytonutrients, antioxidants, etc. come out in the juice, and I retained some of the fiber by adding the pulp back in, so I'm pretty happy with the results.
The third consideration is price. I've been drinking a fair amount of juice lately, specifically a combination of Columbia Gorge Organics' VitaSea (their version of Odwalla's green Superfood) their Pomegranite/Blueberry/Cherry, and Knudsen's organic version of V8. My end result today came to roughly 40 ounces, for about $11 worth of produce. The equivalent amount of the juice combination I've been drinking, near as I can estimate, would run about $9. So the price is a bit higher, but I figure it'll come down somewhat once Farmers' Market season rolls around and I don't have to pay retail for all of the ingredients. Plus, I can tailor it to my own preferences, use fresher produce and get an end result that contains proportionately less filler juices. So I'm considering this a success. Stay tuned as I tweak my juicing techniques...
Posted by
Tommy
at
3:05 PM
1 comments
![]()


